The notch display sensation continues with the new Xiaomi Redmi Note 7 Pro. If you are looking for a budget camera phone with great battery and preformation the Redmi Note 7 Pro is no doubt the best option. But today I am going to discuss how to root Redmi Note 7 Pro. Before you root your Redmi Note 7 Pro make sure you take proper knowledge and precaution. So if you are interested then follow this article to root Redmi Note 7 Pro.
Warning: Flashing can potentially brick or bootloop your device. We don’t hold any responsibility for any error or problem caused by following this guide. Do with your own risks. This root method for all RAM variant of Redmi Note 7 Pro.
How to Root Redmi Note 7 Pro
NOTE: Make a backup of all your data including msg, contacts files, images , Video. etc.
A. Download Tools
- Download and install Universal ADB Driver
- Download and install adb-setup
- Download ADB FILES
- Download TWRP Recovery
- Download Magisk.Zip (Don’t unzip it)
- Download Disable_Dm-Verity_ForceEncrypt_09.02.2018.zip (Don’t unzip it)
- Download Mi Unlock Tool
B. File Preparation
- Install the ADB Driver and adb-setup in your PC and reboot it
- Unzip ADB.zip and you will get ADB Folder
- Now copy paste the twrp.img inside the ADB Folder
- Copy Paste Magisk.zip and Disable_Dm-Verity_ForceEncrypt_09.02.2018.zip inside your external SD card.
C. Enable USB Debugging, OEM Unlock and bind Mi account with the device
- Enable Developer option- Goto Settings > About phone > tap MIUI version 7 times.
- Enable USB Debugging- Goto Settings > Additional settings > Developer options > USB Debugging and enable it.
- Enable OEM Unlock – Goto Settings > Additional settings > Developer options > Enable OEM Unlock.
- Enable MI Unlock- Goto Settings > Additional settings > Developer options > tap on MI Unlock Status and then tap on Add account and device. This will bind your device with MI account if you don’t have Mi account the make a Mi account using your phone number, not email.
D. Unlock bootloader of Redmi Note 7 Pro

- Shut down your phone manually.
- Now hold Volume down key and Power button to enter Fastboot mode;
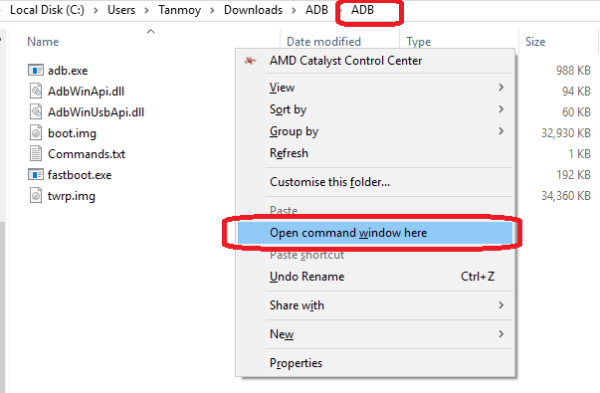
- Open the ADB Folder.
- Inside the folder, hold “Shift” Key then right click and select “Open command Windows here”
- he Command prompt will open.
- Now run the below command. If driver properly installed it will show your device with some alphanumeric character
- If its not showing your device then there is driver problem. So install again all those drivers.
- Now Go to MiUnlock, Sign in with your Mi ID and request for Bootloader unlock with proper reason.
- You will get confirmation on your mobile via SMS after few days.
Once you get confirmation Unzip the miflash_unlock-en-3.3.827.31.zip file
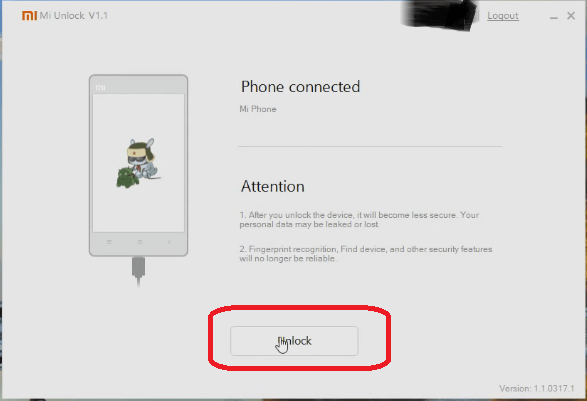
- Run the MiFlashUnlock.exe , and sign in with your Mi-Account
- Shut down your phone manually.
- Now hold Volume down key and Power button to enter Fastboot mode;
- Connect your phone to PC using USB cable and click “Unlock”.
- Once the unlock process completed just hit the reboot button
E. Enable USB Debugging
- Enable Developer option- Goto Settings > About phone > tap MIUI version 7 times.
- Enable USB Debugging- Goto Settings > Additional settings > Developer options > USB Debugging and enable it.
F. Install TWRP Recovery in Redmi Note 7 Pro
- Now connect your Redmi Note 7 Pro to PC via USB cable
- Open the ADB Folder.
- Inside the folder, hold “Shift” Key then right click and select “Open command Windows here”.
- he Command prompt will open.
- Now switch off your device completely
- Then press and hold Vol Down and Power button until it boots up in fastboot mode.
- Now run the below command. If driver properly installed it will show your device with some alphanumeric character
- fastboot devices
- Now its time to flash TWRP, so run this command (Make sure twrp.img file is present in the ADB folder )
- fastboot flash recovery twrp.img
- Once the flashing process has completed, you need to boot into TWRP Recovery.
- Run this command to boot into TWRP,(Make sure twrp.img file is present in the ADB folder )
- fastboot flash recovery twrp.img
- It will boot into TWRP recovery. And you will get screen like this
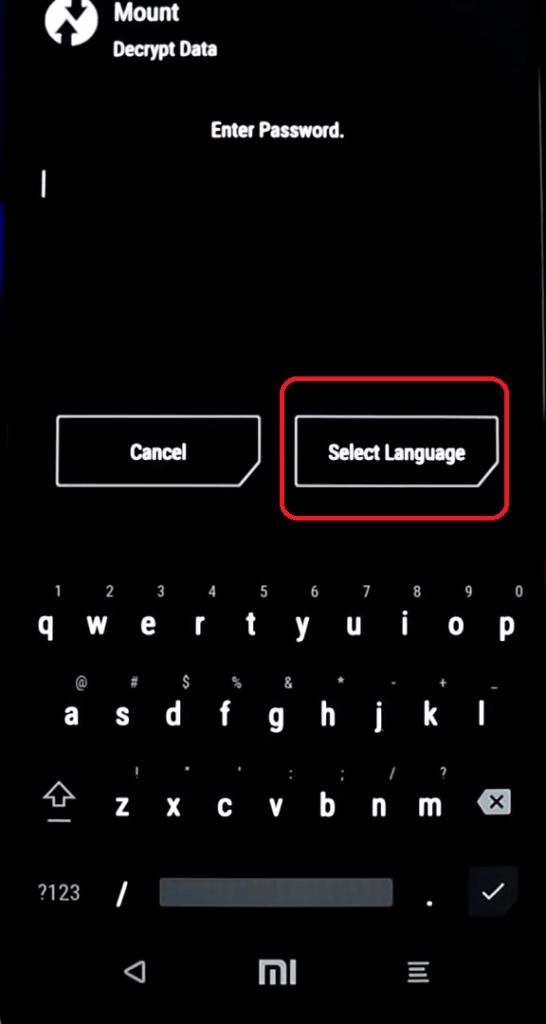
- First you need to tap on language and set your language then tap on cancel and swipe to allow modification
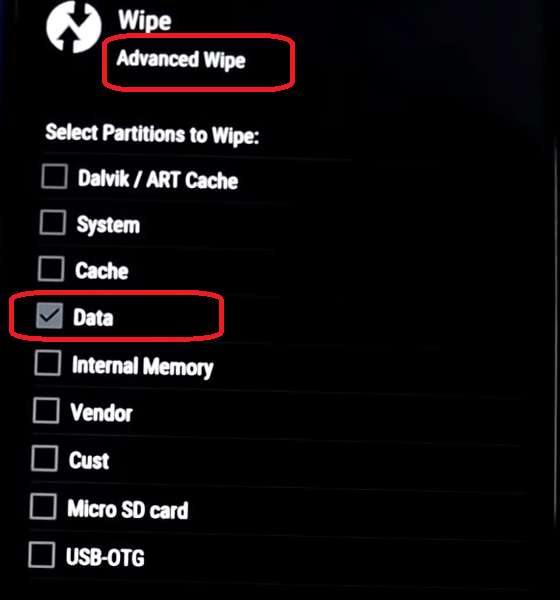
- Now tap on wipe >> Advance Wipe and just wipe the data only
- Once it done, go to the home screen of TWRP
Tap on mount and check system then tap on Disable MPT two times to enable MTP - Now copy paste Disable_Dm-Verity_ForceEncrypt_09.02.2018.zip file from your PC to internal memory of phone
- Now in TWRP tap on install and flash Disable_Dm-Verity_ForceEncrypt_09.02.2018.zip
- Once flashing done tap on Reboot System then tap on Do no install
- Your phone will boot and it will take some time. You need to set up your phone from scratch
- Disconnet your phone from PC
F. Install SuperSu and Root Redmi Note 7 Pro
- Shut down your phone
- Press Power + Vol Up button unless you see MI logo. It will boot into TWRP Recovery Mode.
- You are now on TWRP, tap on install
- Browse the Magisk zip fileand swipe to Install
- Once it has done tap on Reboot >>System
- The booting process may take 5 to 10 minutes.
- Install Root Checker and check whether Redmi 6 Pro rooted or not.
Working method to Root Redmi Note 7 Pro
The easy way to Root Redmi Note 7 Pro
How can I Root Redmi Note 7 Pro
Rooting method of Redmi Note 7 Pro Indian variant