Making a Video with Pictures Using Movavi Video Editor,.Have you ever thought creating a video using some of your pictures? It could be photos or other images – but you’d essentially be compiling them in a slideshow of sorts. The part that is going to make your video stand out however are the additions that you make to give it a unique look, distinguishing itself from any ordinary slideshow.
- 6 Best and Easy Video Editing Software to Download Free.
- Fastest DVD Video Converter Software Features Review.
- Best Screen Recorder Free for Windows Pc and Laptop.
Making a Video with Pictures Using Movavi Video Editor
To compile pictures into a video and make those additions, you should try using Movavi Video Editor. As a video editor it has the tools you need to really make your slideshow stand out – and tread the line between a slideshow and a normal video. Moreover it is actually very easy to make a video with pictures using it.
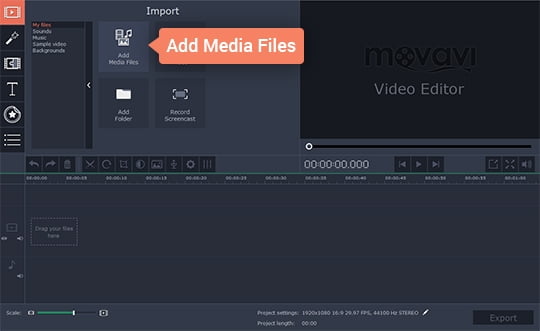
Needless to say the first thing you should do is select the pictures that you want to use in your video, and have an idea as to the order in which you’d like them to appear. Assuming you’d done that, launch Movavi Video Editor and click ‘Create a project in full feature mode’ to open the editor. Next add the pictures to it by clicking the ‘Add Media Files’ button and selecting them.
By default the pictures that you add will appear in the ‘Timeline’ in the lower part of Movavi Video Editor’s interface, on the ‘Video Track’. Initially they will appear in the order that they were added, but you can rearrange them by simply dragging them around till they’re all in the proper position.
If you want you could save the project then and there as a video, but to make it stand out you should take advantage of the full spread of features in Movavi Video Editor. To get started you could apply filters, by opening up the ‘Filters’ tab and dragging the filter that you want to apply to the picture. That can be done for multiple pictures, and indeed you can apply multiple filters to the same picture – if you choose.
Another nice way to give your slideshow some flair is to place animated transitions between certain pictures. To add individual transitions, open up the ‘Transitions’ tab in Movavi Video Editor and drag the one that you want down to the ‘Timeline’ to place it between two pictures. Alternatively you could click on the ‘Transition Wizard’ button right above the ‘Timeline’ and apply a particular style of filters to all your pictures.
Movavi Video Editor Fearures
- Edit video clips, images, and audio on a timeline
- Add transitions, filters, titles, and callouts
- Use special effects like Chroma Key and Slo Mo
- Export videos in any popular format
Make no mistake there are other ways to improve your slideshow using Movavi Video Editor, such as by adding background music or a voiceover narration, inserting customizable text, or even enhancing the quality of the pictures. All the features you need are right there, and you can apply them with just a few clicks.
Supported Os
- Windows
- Mac
Suffice to say Movavi Video Editor will ensure that you have the freedom to ensure your slideshow looks exactly the way that you’d like. With a bit of creativity, you could use this method to turn out some really impressive videos made out of your pictures as well as a few other effects.