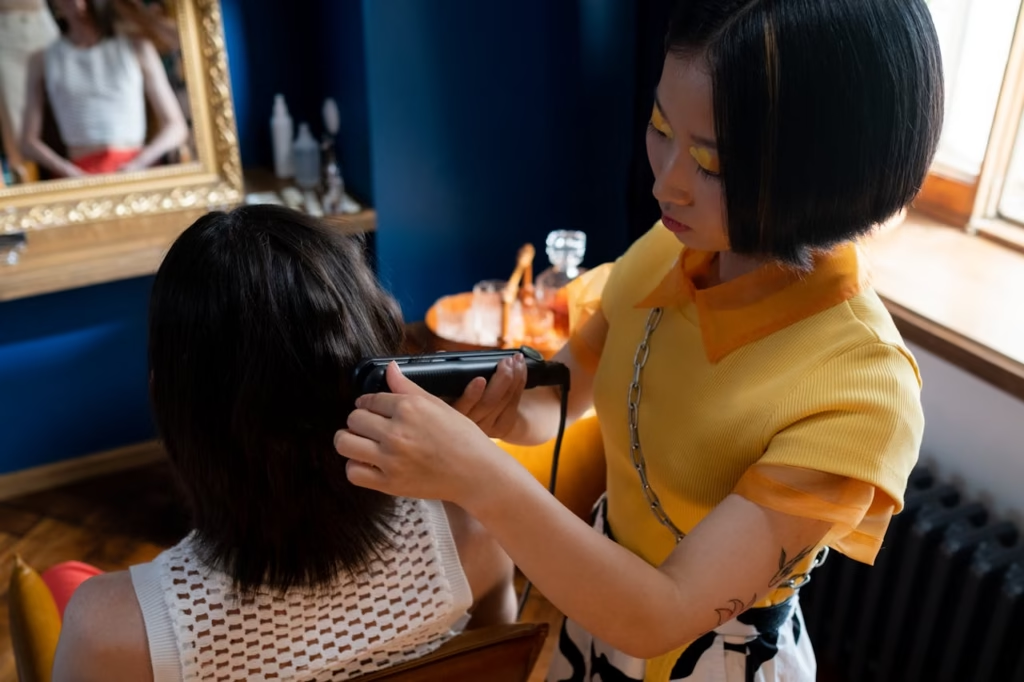
Wedding season is the perfect time to achieve that flawless, polished look often seen on brides and bridesmaids. Have you ever watched a professional stylist create that stunning hairstyle and wished you could do the same at home? With the right tools, a few techniques, and a little practice, straightening your hair like a stylist is easy.
Whether you’re getting ready for a wedding or looking for a gift that will help someone else look their best, a professional hair styler can truly transform your look for the special day.
So, grab your professional hair styler and discover the secrets to achieving that picture-perfect, wedding-ready style at home.
Choose the Right Professional Hair Styler for Your Hair Type
Choosing the right hair straightener is the first step toward achieving a professional-looking finish. Not all hair straighteners are the same, so it’s essential to select one that suits a person’s hair type.
- For thin or fine hair, a professional hair styler with ceramic plates is best. These plates offer smoother results without exposing the hair to excessive heat.
- For thick or coarse hair, Look for straighteners with wider plates and higher heat settings. A professional hair styler with these features can help lock in moisture while taming frizz.
By selecting the right professional hair stylist for their hair type, individuals can style their hair more effectively and easily.
Use a Heat Protectant
Heat protectants protect hair from heat damage while preserving its health and shine.
- Apply Evenly: The product should be misted evenly throughout the hair, focusing especially on the ends, which tend to be more vulnerable to damage.
- Let it Dry: After application, it’s important to let the heat protectant dry for a few seconds before using the hair straightener.
By applying a heat protectant, individuals can safeguard their hair against heat damage and ensure that it stays healthy and vibrant.
Section the Hair for Better Control
For a smooth and professional result, it’s important to section the hair before starting the styling process. This ensures that every part of the hair gets equal attention.
- Create Manageable Sections: Divide the hair into small sections and clip them in place. For better control, start from the bottom and work upwards.
- Use Small Sections: Smaller sections allow the straightener to effectively target each strand, ensuring an even, sleek result.
Sectioning the hair allows for greater control and ensures that the straightener can work efficiently, especially on thick or long hair.
Master the Technique
The technique used when straightening hair is just as important as choosing the right straightener. A steady hand and a smooth motion will produce polished, frizz-free results.
- Clamp and Glide: To straighten, the straightener should be clamped at the roots of each section and then glided smoothly down the hair shaft.
- Avoid Overdoing: Straightening the same section multiple times can cause unnecessary heat damage. Once the section is straightened, move on to the next.
- Set the Right Temperature: The professional hair styler should be set to a temperature suited to the hair type. Fine hair requires a lower temperature, while thicker hair can handle higher settings.
Mastering this technique requires practice, but once it’s perfected, anyone can create smooth, straight hair with ease.
Add Volume or Curls for Extra Flair
If someone wants to add extra texture to their hair, a professional hair styler can do more than straighten it. With a few tweaks to the technique, volume and curls can be added without the need for extra tools.
- For Volume: Angle the straightener away from the roots to add volume to the hair, creating a lift that adds movement and body.
- For Curls: Twist the straightener 180 degrees while gliding down the hair to create loose waves or curls. This gives the hair more texture and depth.
Adding volume or curls can completely transform the look, and using a professional hair styler makes it easy to experiment with different textures.
Set the Style with Hairspray
Once the hair has been straightened and styled, the final step is to lock the look in place. A light mist of flexible hairspray helps set the style without making the hair stiff or crunchy. To avoid clumping, it is best to hold the hairspray 6-8 inches away and lightly mist it all over.
This ensures the style stays in place throughout the day or night while keeping the hair sleek and frizz-free for longer. For extra hold, focus on the ends and any areas prone to flyaways. A good hairspray not only maintains the style but also adds a touch of shine for a polished finish.
Achieve Professional Results Every Time
Achieving professional-level hair straightening at home requires the right tools and techniques. By choosing a professional hair styler, applying heat protection, and following the correct steps, you can effortlessly create smooth hair. These steps elevate your styling routine and help to achieve salon-quality results.
For those looking to upgrade, brands like Dyson offer hair stylers with advanced features that make styling quicker and more effective, ensuring long-lasting, flawless results. With its blend of innovation and practicality, a professional hair styler also makes a thoughtful wedding gift for women and men alike.


Leave a Comment
You must be logged in to post a comment.