A multi-functional screen recorder can always facilitate your working and studying efficiency in life, and FonePaw Screen Recorder is such an example. Regardless of recording an online conference, lesson, or the highlight moments while gaming, the program can provide corresponding professional assistance to you. Its flexible recording modes also allow free personalization, making it quite simple to record screen on Mac and Windows with audio.
Therefore, the FonePaw Screen Recorder review today will mainly concentrate on introducing what features have attributed to the success of this screen recorder. Please scroll down to read and take it to record the Mac screen with audio in no time!
- How to Record Mac Screen on Mac with FonePaw Screen Recorder
- Sparking Features of FonePaw Screen Recorder
- FonePaw Screen Recorder Tech Specifications
- FonePaw Screen Recorder Free Trial VS Registered Version
- Final Verdict
How to Record Mac Screen with FonePaw Screen Recorder
To omit your effort in recording screen on Mac, FonePaw Screen Recorder has simplified manipulation, allowing you to proceed with an effortless experience in recording computer screens. Now, please walk through the guide to master how FonePaw Screen Recorder works in advance.
Step 1. Install FonePaw Screen Recorder
Firstly, please download the installation package of FonePaw Screen Recorder and double-click to proceed with the installation. You only need to follow several on-screen instructions to get it installed.
Step 2. Select A Recording Mode
Open FonePaw Screen Recorder after its installation completes. From its main feed, you can select a recording mode to get started based on your recording needs. By clicking into the recorder, you can customize the recording settings in preferences.
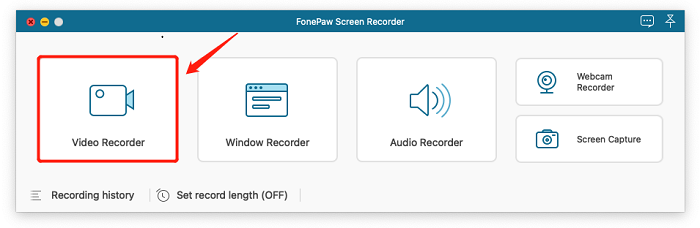
For instance, in Video Recorder, you can change the recording area flexibly as well as the sound volume. Furthermore, whether to toggle on webcam, microphone or not is entirely based on your needs!
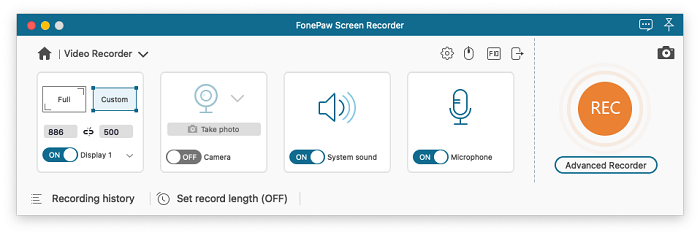
If you consider setting up more settings, including both the quality or recording preference options, you can turn to Preferences to make the changes casually.
Step 3. Initiate Recording
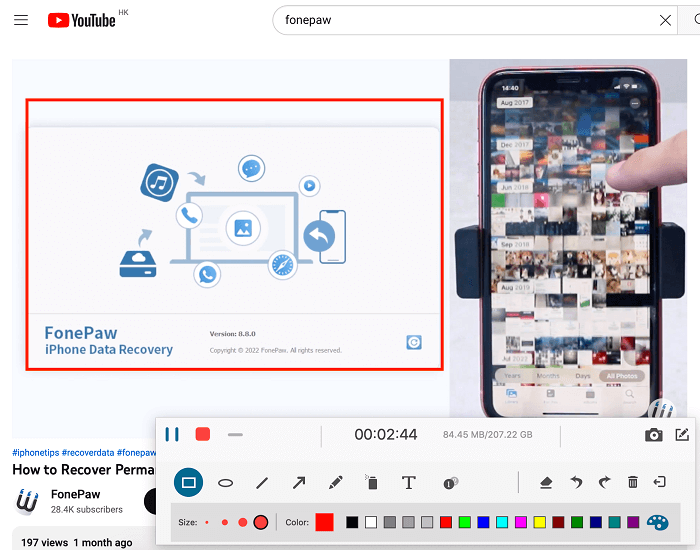
Subsequently, once all settings are made, simply click on the REC button on the recorder and FonePaw Screen Recorder will initiate the recording for you. As there is a drawing panel provided, it is possible to add annotations or take notes on the recordings whenever you need.
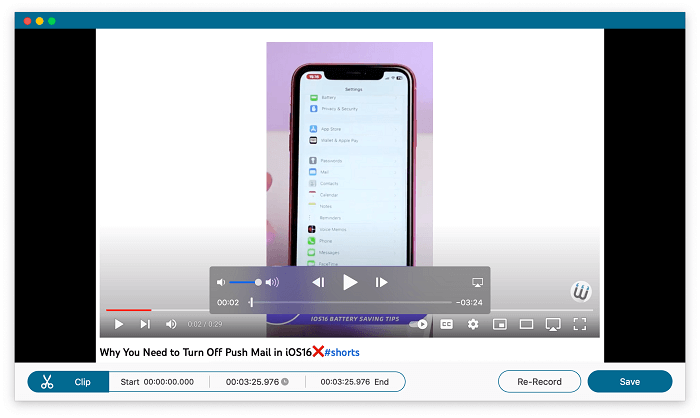
Step 4. Preview and Save Recording
After the object you are capturing ends playing, please also stop the recording by clicking on the Stop button. Subsequently, you will be turned to the preview window to adjust the recording length by trimming its starts and ends.
Finally, simply tap Save to export the recording to your local folder in no time!
Sparking Features of FonePaw Screen Recorder
Surely, despite simplified manipulation, FonePaw Screen Recorder is also equipped with multiple sparking features, facilitating the program to be a top-ranking option on many competitive lists. We have concluded some of them for you:
Record Mac Screen with Audio
When some devices such as Mac computers have restricted users from capturing audios with the screens, FonePaw Screen Recorder is able to bypass such a obstacle and allows you to record all on-screen activities with audios, including both system sounds and microphone voices.
It even offers both noise cancellation and microphone enhancement features to ensure the high-quality audio recording on Mac and Windows! You can surely get the best sound effects with your video recordings with the help of FonePaw Screen Recorder.
Free Recording Customization
FonePaw Screen Recorder also enables high customization for any of you to control the recording outputs in ways you like. From the recording area, volume level, recording format and quality settings, and more in preferences.
What’s more, FonePaw Screen Recorder also provides some advanced settings to enable a more convenient screen recording experience. For instance, by toggling on the scheduled recording or auto-stop recording modes, you just need to preset the starting and ending points (or recording length) to let the program automatically complete the recording for you, greatly improving the efficiency in capturing your screens.
Webcam Recording Supported
For many users who have online conferences, video calls, or e-lessons requirements, you need to turn on webcams. Surprisingly, FonePaw Screen Recorder also embeds the webcam recorder to help you capture the cameras, too. During these important occasions, you can enable the webcam recording mode to avoid missing any important messages from the users on the other sides.
Add Instant Annotations
During the recording, FonePaw Screen Recorder also provides a handy drawing panel for users to take notes or add some instant annotations while you need. Especially when you are having an online lesson and have to mark down important knowledge, this feature will be essentially important for you.
Flexible Screenshot Taking
Despite the video/audio recording, snapshot taking is also an important part of FonePaw Screen Recorder. It is set to be both an independent feature and also a side-feature – you can still capture the screen to export it as an image while the video recording is proceeding!
FonePaw Screen Recorder Tech Specifications
Please also make sure that FonePaw Screen Recorder is supported on your devices before getting started with it:
| System Requirements | |
| Windows OS | Windows 11/10/8.1/8/7/Vista/XP (32 bit or 64 bit) |
| Mac OS | Mac OS X 10.12 or above (macOS Ventura) |
| Resolution | 1280 x 800 display or above |
| CPU | 1GHz Intel® processor and Apple M1 chip |
| RAM | 512 MB or more (1024MB Recommended) |
| Display Card | Accelerated 3D graphics – 64MB |
| Hard Disk | 2GB hard drive space |
| Supported Devices | |
| Windows Computer & Laptop | HP, Lenovo, Samsung, Dell, TOSHIBA, Sony, Acer, Microsoft, Razer, more |
| Mac Computer | iMac, Macbook Air, Macbook Pro, Mac Mini |
FonePaw Screen Recorder Free Trial VS Registered Version
For some of you, pricing can be a factor you care about. For users convenience and trust, FonePaw Screen Recorder has offered its free version for trying before paying to subscribe. However, there are still restrictions between these two states:
| Free Trial | Registered Plan |
| Record up to 3 minutes of each recording | Unlimited recording length |
| 30 days for free trial | Unlimited recording amounts |
If you decide to subscribe to FonePaw Screen Recorder, you get the following plans to select:
| Plans | Pricing | Devices |
| One-Month | $19.56 | 1 device |
| One-Year | $38.46 | 1 device |
| Lifetime | $79.77 | 2 devices |
Final Verdict
If you are also finding a multi-functional screen recorder for Mac and Windows, FonePaw Screen Recorder is no doubt a great option. The free version is open to everyone! Why not install it now and try?


Leave a Comment
You must be logged in to post a comment.