We already know that WordPress is most used blogging platform and CMS in the world. One of the it’s main feature is the ability to enhance blog functionality and Utilities by installing WordPress plugins. By today, WordPress Plugin library has 56,334 plugins with 1499,346,405 downloads . This is one of reasons why people choose WordPress as a blogging platform as well as CMS also.
HOW TO INSTALL A WORDPRESS PLUGIN IN YOUR BLOG?
A WordPress plugin is a program written in php language which contains one or more functions that adds a specific set of features or services to the WordPress Blog.
As I already told that there are thousands of free plugins in WordPress library to supercharge your website or blog. You can check them here at http://WordPress.org/plugins to find your preferd plugin .
Remember, using too many plugins without knowing their functions could slow down your weblog or give you other unexpected results . So choose plugins wisely and Install essential plugins only.
Normally there are three ways to install a WordPress plugin :
- Install Directly from WordPress Plugin Library
- Install by Plugin upload function in WordPress
- Install Using FTP
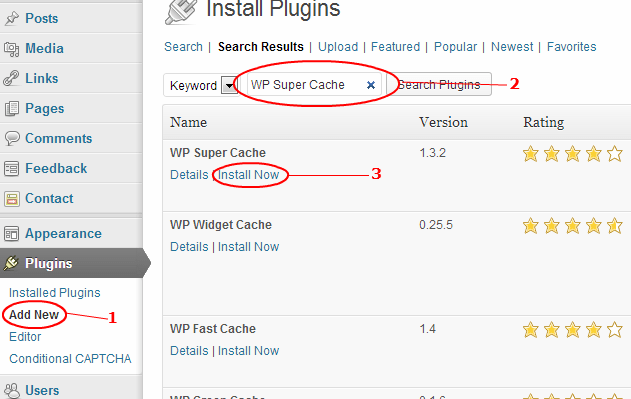
#1 : INSTALL DIRECTLY FROM WORDPRESS PLUGIN LIBRARY
This is most common and simple way to install a WordPress plugin which is already in WordPress library.
- Login and Go to your WordPress admin area.
- Click on the “Add New” under plugin tab.
- Search for your desired plugin (In this tutorial we will install “WP Super Cache” plugin)
- Now you will see a page with search results,Click “Install Now” Link under the plugin name you want to install
- After Installing You Will See message that your plugin has been Successfully installed.Click on the activate plugin link to activate it.
- Now your plugin is active. You will be redirected to plugin list page.
How to Install WordPress Plugin
#2 INSTALL USING PLUGIN UPLOAD FUNCTION IN WORDPRESS
If you are unable to install plugin using above method ,you should download it from WordPress library and Install using this way. This method also works If you are going to use a premium plugin which is not available in library . You only need to have plugin as .zip file on your PC which you are going to Install.

Install WordPress Plugin using Upload Function In WordPress
- Click on Plugin » Add New. Then click on the Upload Tab.
- You will see a screen like above.
- Browse the file and upload it (zip files only).
- You will be taken to the activate a plugin page.
- Activate the plugin and You’ve done .
#3 INSTALL USING FTP CLIENT
If your are unable to install plugin using both methods given above, then you should use this way to Install it. But first you must have FTP access of your blog and have a FTP client (like FileZilla) installed on your PC. If you don’t have, then download it from http://sourceforge.net/projects/filezilla .
Install WordPress Plugin Using FTP
- Extract all contents of zipped file.
- Open FTP client and Go to root directory of your blog (Normally it seems like /public_html )
- Open path wp-content/plugins .
- Upload all plugin files to remote website.
- Once you have uploaded, then you would need to click on the Plugins tag in your WordPress admin panel.
- You will see the plugin you just uploaded. Click on the Activate button and you are done.
I hope this guide will be helpful for you . If you notice that there is something missing or Wrong feel free to let us know.Please share your experience in comments.


Leave a Comment
You must be logged in to post a comment.