Prepare for installation!! What you need?
Chrome installed on any ChromeOS, Windows, or Mac device
Device to create the USB installer — The device that you use to create your USB installer can be different to the device you plan to install ChromeOS on.
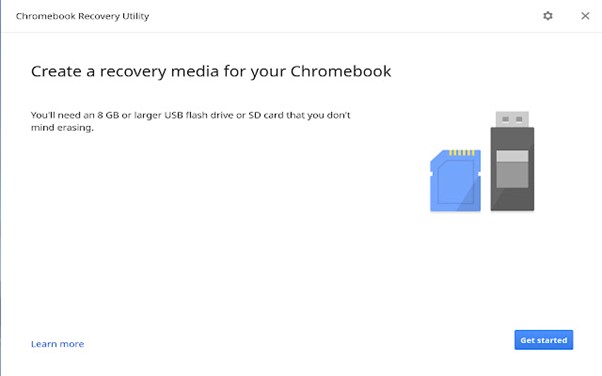
8 GB or more
Using Chromebook Recovery Utility
Step 1: Installing Chromebook Recovery Utility
- Launch the Chrome browser on your ChromeOS, Windows, or Mac device.
- Navigate to the Chrome Web Store.
- Click “Add to Chrome” located at the top right.
- When prompted, select “Add extension.”
- You’ve now added the Chromebook Recovery Utility as an extension to your Chrome browser.
Step 2: Enabling the Chrome Recovery Utility Extension
- In the top-right corner of your Chrome browser window, click on “Extensions,” and then choose “Manage extensions.”
- Locate the Chromebook Recovery Utility and switch the toggle to the right.
- Optionally, you can click “Details” and toggle the switch to the right.
- Once you’ve enabled the Chromebook Recovery Extension, you can access it by clicking on the extension in the browser’s extension panel.
Step 3: Creating the USB Installer
- Open the Chrome Recovery Utility extension within the Chrome browser.
- Select “Get started.”
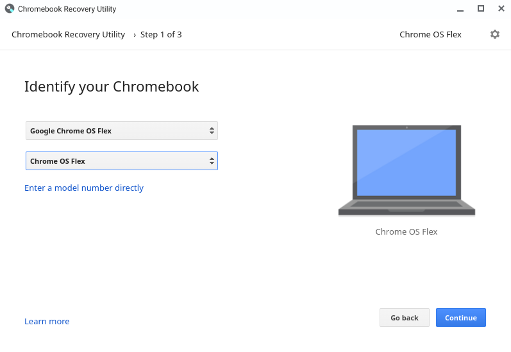
- Choose “Select a model from a list.”
- Under “Select a manufacturer,” locate and click on “Google ChromeOS.”
- In the “Select a product” section, find and click “ChromeOS.”
- Click Continue.
- When prompted, insert your USB drive.
- From the dropdown menu, select the USB drive.
- Click Continue.
- Click Create now.
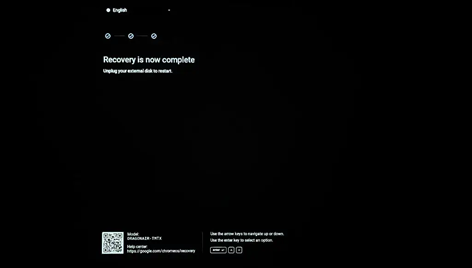
Note: During the process, it is normal for Chrome Recovery Utility to show unusual percentages. - When you get a message that your recovery media is ready, remove your USB drive from the device.
Step 3.1: Download the Image Manually Link
Step 4: Enter recovery mode
Boot from the USB PenDrive
Use the USB installer that you just created to boot the device you want to run ChromeOS USB on
If you have any peripherals connected to your Chromebook, such as a mouse or an external hard drive, disconnect them.
To enter recovery mode, follow these instructions based on your device:
For Chromebooks:
1. Press and hold the Esc and Refresh keys simultaneously.
2. While holding these keys, press the Power button.
3. Release the Power button when you see a message on the screen, but continue holding the Esc and Refresh keys.
On some Chromebook models:
1. Press and hold the Esc and Maximize keys simultaneously.
2. While holding these keys, press the Power button.
3. Release the Power button when a message appears on the screen, and let go of the Esc and Maximize keys.
For Chromeboxes:
1. Start by turning off the Chromebox.
2. Using a paper clip or a similar object, press and hold the recovery button.
3. Turn the Chromebox back on by pressing the Power button.
4. Release the recovery button when you see a message displayed on the screen.
For Chromebits:
1. Begin by unplugging the Chromebit from its power source.
2. Use a paper clip or a similar object to press and hold the recovery button.
3. Reconnect the Chromebit to the power source.
4. Release the recovery button when a message appears on the screen.
For Chromebook tablets:
1. Press and hold the Volume Up, Volume Down, and Power buttons simultaneously for at least 10 seconds.
2. Release these buttons after the specified time.
Once you’ve successfully initiated ChromeOS from your USB installer, you have the option to perform a permanent installation, which involves erasing the current operating system on the device and replacing it with ChromeOS. Alternatively, if you’re not prepared for a permanent installation, you can opt for a temporary run of ChromeOS using the USB installer. This allows you to assess and confirm the functionality of the device, including aspects like networking and input tools, to ensure they operate as intended.
Follow step by step How to Install Windows 10 / Windows 11 on ChromeBook.


Leave a Comment
You must be logged in to post a comment.