This method is Created / Modified by us in case people are getting errors and issues to flashing the full Firmware
To begin with, the majority of Chromebook models are not intended for running Windows.
All New ChromeOS Firmware Script (100% Working Method)
They are specifically engineered for ChromeOS,
which explains their impressive battery life, affordability, ease of management, and built-in security advantages.
In simple terms, attempting to convert your Chromebook into a Windows laptop contradicts the fundamental reason for owning a Chromebook.
These instructions come with a significant disclaimer!
They do not ensure a fullproof method for installing Windows on Chromebooks.
We are presenting them below solely to showcase the intricate and potentially risky steps associated with the installation process.
Mrchromebox New Modified Script (Working Method)
Here’s a step-by-step guide to installing Windows on a Chromebook.
Step 1: First, gather the necessary tools to open the Backpanel of the Chromebook
Step 2: NOTE: Search online to find the write-protect screw’s exact location in your specific Chromebook model.
Step 3: Hold down the Power button until the Chromebook turns off
Step 4: Flip the Chromebook over and remove the bottom shell.
Step 5: Locate and remove the write-protect screw.
Step 5.1: In Some cases, You Just need to Disconnect the Battery
Step 6: Put the bottom shell back on the Chromebook and plug in the power adapter.
Step 7: Press the Esc + Refresh + Power buttons to turn the Chromebook on in Recovery Mode.
Step 8: When the screen says Chrome OS is missing or damaged, press the Ctrl + D keys.
Step 9: Press the Enter key to turn OS verification off.
Step 10: The Chromebook should reboot into Developer Mode. When the screen states OS verification is OFF, press the Ctrl + D keys to boot into Chrome OS.
Step 11: After booting into Chrome OS, press the Ctrl + Alt + T keys simultaneously. This opens the Terminal.
Step 12: Type shell and press the Enter key.
Step 13: Type the following command and press the Enter key to download and run a script file with root privileges:
(Note: If you get root privileges error then you need to Downgrade your Chromeos to 117 116 115 114 Images)
How to install ChromeOS Via USB Bootable / Downgrade OS (ChromeOS Download Link)
Code:
cd; curl -LO https://babblefeed.in/firmware-util.sh && sudo bash firmware-util.shStep 14: This Script May lead you change the Fw WP Change state Enable to Disable
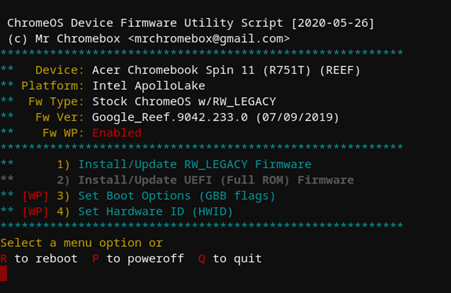
Step 15: Type 2 and press the Enter key. This selects the Install/Update Full ROM Firmware option
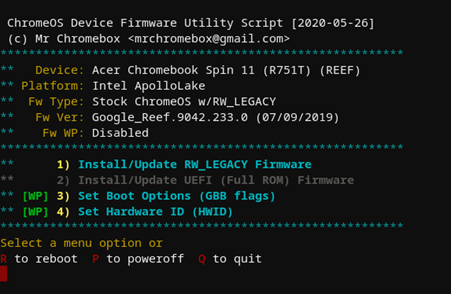
Step 16: Type Y to continue and follow the Steps
Important Step: Insert a USB drive to create a backup of the Chromebook’s current firmware and follow the steps
Step 17: After Backup is Done Kindly Remove the USB Pendrive and save the rom to safe place
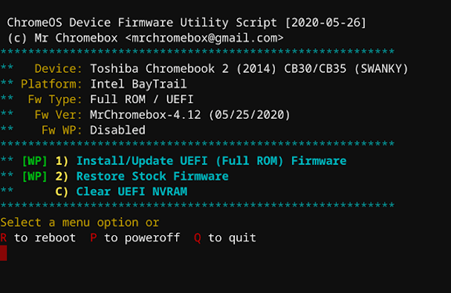
Step 18: Firmware Utility Script, on device with Full ROM firmware and WP disabled
Step 19: Turn off the Chromebook after the new Windows-friendly firmware installs.
Final Step: Go to your second PC and follow the instruction in our separate article,
How to Install Windows10 / Windows 11 from Microsoft and Create a USB Bootable drive that will install Windows 10 / Windows 11 on the Chromebook.
Step 20: On your second PC, go to CoolStar’s website to see what Windows-based drivers you’ll need to install on the Chromebook. Find them and download them to the USB drive you previously used to back up the Chromebook’s original firmware.
In the screenshots provided above, script functions are displayed in cyan text only if they are available for the device and the current firmware. Any functions that are unavailable are shown in grey. Additionally, features that necessitate disabling the firmware WP are explicitly marked, and their functionality depends on the current WP state.
The Reboot and Power Off options are (hopefully) sufficiently self-explanatory 🙂
What is MrChromebox?
MrChromebox has reserved all rights for their custom firmware and related tools, we just trying to help people who are finding difficulties.
The MrChromebox site primarily serves as a resource and repository for custom firmware and related tools for Chromebooks. Here’s what you can typically find on the MrChromebox site:
1. Custom Firmware: MrChromebox provides custom firmware for various Chromebook models. This firmware allows users to modify their Chromebook’s BIOS/UEFI to enable features not supported by the default firmware. This can include the ability to install alternative operating systems (like Linux), remove hardware restrictions, or unlock additional functionality.
2. Documentation: The site often includes detailed documentation and guides on how to install custom firmware, troubleshoot issues, and make the most of the features it unlocks.
3. Support: MrChromebox and the community associated with the site often offer support through forums or chat, helping users with questions or issues related to their modified Chromebooks.
4. Downloads: Users can typically find the necessary firmware files and tools for specific Chromebook models to download from the site.
5. Device Compatibility: Information about which Chromebook models are supported and what features are available for each model.
6. Warnings and Disclaimers: Important warnings and disclaimers about the potential risks associated with modifying your Chromebook’s firmware, as this can void warranties and carry some level of risk if not done correctly.
It’s important to note that modifying your Chromebook’s firmware carries inherent risks and may void your warranty. Users interested in using the MrChromebox firmware or tools should carefully read and follow the provided instructions and be aware of the potential consequences. Additionally, it’s essential to ensure that you’re using the correct firmware for your specific Chromebook model.
MrChromebox has reserved all rights for their custom firmware and related tools, we just trying to help people who are finding difficulties


Leave a Comment
You must be logged in to post a comment.